DNS Configuration
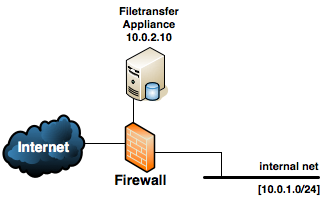
A typical LiquidFiles network layout looks like the following:

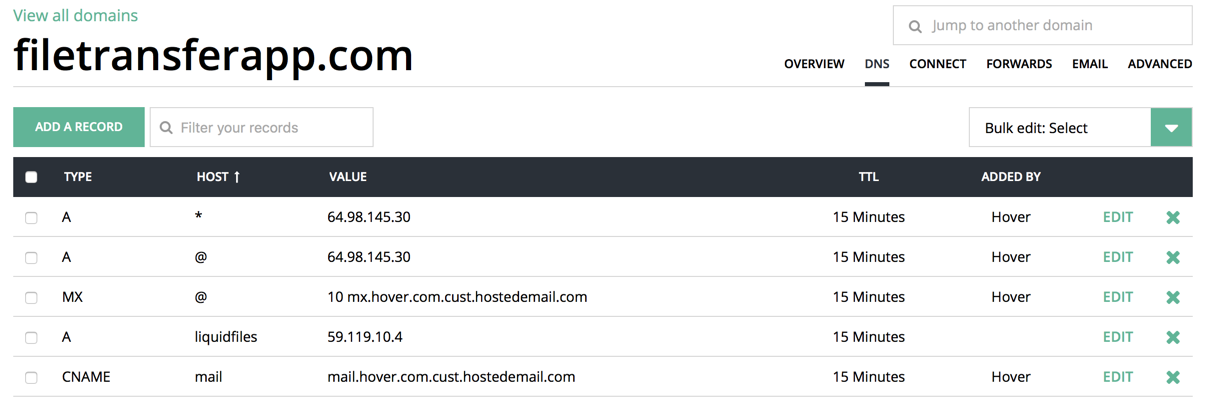
When we add DNS configuration, the aim is to translate a Fully Qualified Domain Name (FQDN) to an IP address. If we assume that your domain is filetransferapp.com, you want to use the FQDN liquidfiles.filetransferapp.com, and you have assigned the IP address 59.119.10.4 as the external IP address that the firewall will translate to 10.0.2.10, you would configure your DNS like the following:

I.e. The host liquidfiles in the domain filetransferapp.com has an A record of 59.119.10.4. Obviously you would need to adjust the names and IP address for your particular domain and network.
This particular DNS configuration example is from hover.com. Regardless of what DNS server you're using, the fields and the configuration would be very similar.
Internal DNS configuration
One of the issues we have to tackle is dealing with internal clients (on the 10.0.1.0/24 network in the above diagram). Ideally, we would want clients to use the internal IP address (10.0.2.10) when on the internal network and the external IP address (59.119.10.4) when on external networks.
This is not a LiquidFiles specific problem. This is ideally how you'd configure your network for all your resources so any mail, web server or similar server can use the same name everywhere and you'd get clients to use the best IP address depending on the clients location.
There are a couple of different ways of dealing with this:
Firewall Configuration
Some firewalls can do address translation so that it doesn't matter if the client is on the inside network or the public internet, it will happily address translate the external IP (59.119.10.4 in the above example) so that it just works regardless which network the clients comes in from. This would be the simplest solution if your firewall supports this. Some firewalls will only translate external IP address on the external interface so it won't work that clients connect to external IP addresses from internal networks.
Some firewalls can do DNS snooping. When clients on the inside network queries an external DNS server, it can automatically override names so if you have a public DNS server like in the hover example above, you configure that when the firewall sees a hostname, it will automatically rewrite the response to something you specify. In the example above, you'd get the firewall to snoop on the internal interface for liquidfiles.filetransferapp.com and when it sees a query for it, it will respond with the LiquidFiles internal IP address 10.0.2.10.
Dual DNS Configuration
For all clients connected to an IP network, you configure the quadruple: IP address, Netmask, Default Gateway and DNS server. One of the options you have when designing you network and IP infrastructure is to setup two DNS servers for your domain. One DNS server, typically in a DMZ or using a public DNS service, that serves external clients, and one internal DNS server for the same domain that serves internal clients with internal IP addresses.
In the example above, we use the domain filetransferapp.com. We could use hover.com to serve this domain for external clients (or install a DNS server in the DMZ). This would respond for liquidfiles.filetransferapp.com with 59.119.10.4. We then install a second DNS server on our internal network which is also configured to respond for filetransferapp.com but when it's been queried for liquidfiles.filetransferapp.com it will respond with 10.0.2.10.
In our DHCP configuration, we'd then configure all clients on the internal network to use the internal DNS server that will respond with internal addresses for our own domain and lookup other domains on the Internet.
A drawback of using this method is that every record on the public DNS server needs to be replicated on the internal DNS server.
Split Horizon DNS
A Split Horizon DNS is an advanced DNS server technique available in some DNS servers (unfortunately, we're not aware of any public DNS servers like hover.com with Split Horizon capability). What it does is basically like the Dual DNS Configuration above but in one DNS server. Instead of two DNS servers, you configure two DNS server views, so when clients connect from certain IP addresses you respond with IP addresses from one view, and when clients connect from other IP addresses, you respond with IP addresses from a different view or the default view.
In this example if you use a DNS server with Split Horizon capability, you'd configure an internal view for filetransferapp.com with internal IP addresses that would be used when responding from clients quering the DNS server from the internal IP addresses 10.0.0.0/16 and the default view with external IP for all other clients.
Other uses for Split Horizon DNS would for instance be to respond with IP addresses for different web servers so if you have your public web server mirrored in different locations across the world, you can use the same web server name everywhere and based on the connecting IP address, you'd respond with the IP address to the closest web server.
The biggest problem with Split Horizon DNS is that it's not a very well know or popular feature so not a lot of admins think of using it.
For documentation how to configure this with Microsofts DNS server, please see this article.
DNS Masquerading
A popular Unix/Linux based DNS resolver is Dnsmasq. You setup Dnsmasq on your internal network and get all clients on your network to query it as the local DNS server. With no configuration, it will resolve and cache results for improved performance in your network, and you can also use to masquerade certain hostname, similar to the DNS snooping feature in some firewalls. With Dnsmasq (or similar) as the DNS resolver in your network, you can configure it to override certain hostnames with internal equivalents, so when clients queries for liquidfiles.filetransferapp.com it will respond with 10.0.2.10 in the example on this page. If you have other internal resources on your network, you'd make similar overrides and for all other names, it will query specified servers on the public Internet.
Client specific hosts Configuration
The crudest configuration would be to use the hosts file on each client. This file is located in /etc/hosts on any Unix/Linux system and in C:\Windows\System32\Drivers\etc\hosts on Windows. An example for the above network would be:
10.0.2.10 liquidfiles.filetransferapp.com
This configuration would make this specific client know that when connecting to liquidfiles.filetransferapp.com, use IP address 10.0.2.10. Obviously, this is not a scalable or production friendly configuration (as this client would still try to use 10.0.2.10 even if it leaves the internal network) but if you're just trialling LiquidFiles on a couple of systems, it will work just fine.
