Migrating to a New Server — Overview
Sometimes we have to migrate LiquidFiles to a new server. This could be because we're changing from a local deployment to a Cloud Deployment or vice versa. Or it could be that we're changing data centre for the LiquidFiles deployment or sometimes this is required when we've required to change the underlying operating system for instance when moving from LiquidFiles v3.x to v4.x.
This document is a high-level overview of what happens during migration. For documentation on performing the actual migration, please see the Migration Options documentation.
When we're running any of the migration procedures, what will happen is that the destination system becomes a replica of the source system, with the exception of the following:
- IP Address configuration including default gateway.
- DNS servers.
- NTP servers.
- Static routes.
- root password.
- System email notification address.
- Syslog Forwarder
- System Hostname (the system hostname will be set to the Public Hostname).
The reason why these things are not migrated is that while it would make sense to migrate some of these things when migrating to a different system in the same data centre, we're not expecting things like static routes or IP addresses to the be same in different data centres.
Example Migration
Phase One — Migrate for test

For this example deployment we have an existing LiquidFiles system (https://files.company.com) with an internal IP Address of 192.168.10.10 that is translated on the Public Internet to 20.30.40.5.
For our example migration, we're installing a new LiquidFiles system, in this case in the same data centre, but it really could have been anywhere. The IP Address for this new system in our example is 192.168.10.11.
When we run the migration, this is the overview of what's going to happen:
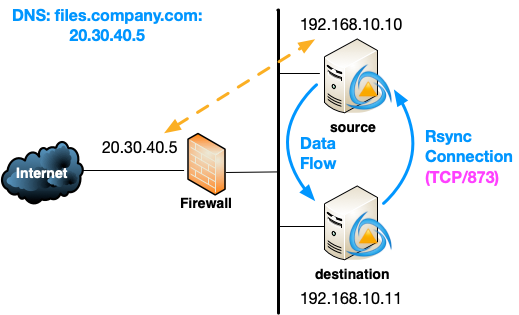
We'll cover the details of how this will be function in detail later, and we'll first run the command ft migrate on the source system to prepare the system for migration. We'll then start the migration on the destination system and that will connect to the source system using Rsync (TCP/873).
In this example, the systems are right next to each other, but if the systems are further apart with firewalls or similar in between, you will need to make sure that this connection is permitted.
When the migration has finished the destination system has now become a replica of the source system for all LiquidFiles related functions, with the following exceptions:
- IP Address configuration including default gateway.
- DNS servers.
- NTP servers.
- Static routes.
- root password.
- System email notification address.
- Syslog Forwarder
- System Hostname (the system hostname will be set to the Public Hostname).
We can now stop
Testing the Migration
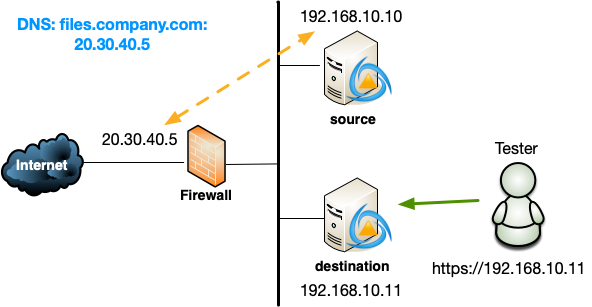
After the migration has completed you can connect to the destination system and test whatever you feel is needed to test to be confident for the production change-over.
The production traffic will still flow to the source system just as it did before.
If you've done this procedure a few times and feel confident, you can skip this testing. Realistically, this migration procedure is pretty binary — if there hasn't been any error during migration all the data will have been migrated, or the migration have failed with an error and none of the data have been migrated. And again, please feel free to do as much testing as will make you confident it will work as expected.
Depending on what your planned Production Change-over strategy is, you want to make sure you test external connections from the destination system, this would include things like:
- LDAP Authentication
- SAML Authentication
- SMS 2-Factor Authentication
- LiquidFiles License Server Connection
- GeoIP Lookups
Phase Two — Final Migration for change-over
The final migration procedure for a change-over works exactly the same way as the Phase One migration with the only change being that ft migrate is run on both systems, only with different options.
This time, there will again be an Rsync (TCP/873) connection from the destination system to the source system.
This time, and you can run this procedure however many times you like, only the changes will be copied over. So if you have a grand total of 1TB data on the source system and only 2GB has changed since the last migration, only 2GB will be copied over. So running a multiphase migration is also a good way of minimizing downtime for users.
Migration is Unidirectional (one-way) only
Every so often we get asked if it's possible to run the two systems in parallel for a while and we would strongly advice against that.
The reason is simply that each time you run the migration, anything that's happened on the destination system will be deleted and it will again become a replica of the source system. So if you've had actual users sending files on both systems, you will get data loss. In that case you can choose to simply discard the source system and loose the data users have sent there, or you can run another migration and any data any user has sent on the destination system will be deleted as part of the migration.
It's not possible to merge two systems. You'd have to choose one or the other.
Production Change-Over
You now have two identical system, the source system at 192.168.10.10, and the destination system at 192.168.10.11. The users, groups, configuration and any data will be identical.
To perform the actual change-over we have three different options:
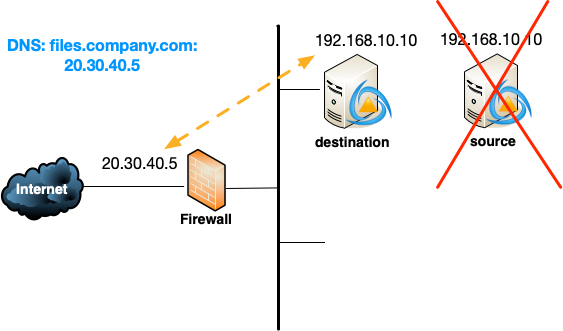
1: Shutdown the source system
The first option is to shutdown the source system and set the 192.168.10.10 address on the destination system. It is important in this case that we do shutdown the source system so there's no IP address conflict in the network.
The rollback strategy for this scenario would be to reverse the change, configure the destination system to use 192.168.10.11 and start up the source system.
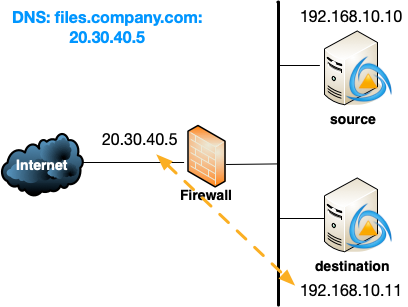
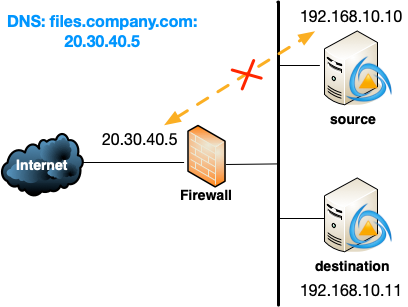
2: Firewall Redirect
As an alternative, we can use the firewall to redirect the external 20.30.40.5 address to the new 192.168.10.11.
The rollback strategey for this method is to revert the changes in the firewall and point 20.30.40.5 to 192.168.10.10 again and users will continue to use the source system while we investigate.
When you're confident the destination system works as expected, you can decommission the source system.
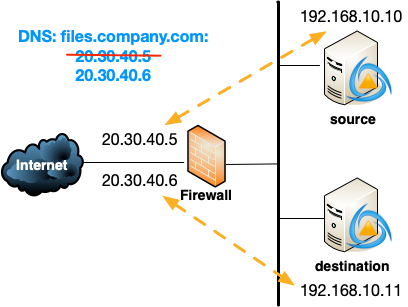
3: DNS Change
Yet another alternative is to allocate a new external IP address, in this example 20.30.40.6 and update our DNS to point our LiquidFiles Public Hostname to this address instead.
The rollback option for this method is to reverse the DNS change to point the LiquidFiles Public Hostname (files.company.com) back to 20.30.40.5 while we investigate.
When you're confident the destination system works as expected, you can decommission the source system.
Stopping the source system during migration
When you run ft migrate on the source system you'll have the option of stopping production traffic to the source system or not.
At first it may seem like why would I ever want to stop production traffic?, but the reason why we want to stop production traffic for the final production migration is because we want to make sure there are no changes after the migration has taken place.
Should you stop production traffic during migration?
- Any form of test migration or multistage migration — No.
- Final migration in a multistep migration or single-step migration — Yes.
What happens to the source system during migration?
Another fairly common question is — What happens with the source system when you run ft migrate?.
In Short — Nothing. Slightly longer — Almost nothing.
When you run ft migrate on the source system and choose not to stop the production traffic, this system continues to function exactly like it was before. Obviously if you choose to stop the production traffic then no one will be able to connect, so that's the slightly longer Almost Nothing case.
ft migrate will run on the console one the source system until it's interrupted. If you login with SSH and the connection is terminated, that will interrupt ft migrate, or you can manually interrupt it by pressing control c while ft migrate is running.
ft migrate on the source system will create a database backup and prepare the system for migration. When ft migrate is interrupted, it will clean the system up and it will be just as it was before ft migrate was executed.
How Long Does the Migration Take
Initial Migration
The overwhelmingly majority of the time the initial migration takes is to copy the data. If you have 100GB of data and a 1Gbit/s connection, that's roughly 100MB/s or a transfer time of 1000s or about 20 minutes. If the network is congested and you can only reach 50MB/s, it will take twice as long. If you have 2TB of data, it will take about about 5 hours if you can reach 100MB/s and about 50 hours if you can transfer at 10MB/s between data centers or similar.
Subsequent Migration
To minimize downtime it's best to do a Multistep migration and do the production change-over as close as possible to the previous migration. The closer you run the production migration to the previous migration, the less data there is to copy. The same calculation as in the previous section applies for transfer speeds.
Production Change-Over
Different Change-Over methods have slightly different migration times but it basically comes down to how fast does your engineers work. A skilled firewall engineer that is not hindered by company politics can do a NAT change in a couple of minutes. But some firewalls with thousands of rules will take 20 minutes to push a change before it comes into action.
The technical minimal time for a DNS change is 1 minute but some DNS products won't let you set a timeout less than 10 minutes. This is basically questions you need to ask your engineers working on this, how long this will take in your environment, with your products and your internal politics.
How Do I Rollback?
If you follow the change-over documentation above, you can see that in the different rollback options the different migration options.
Can I change the Public Hostname / URL and migrate at the same time?
No, you cannot change the Public Hostname / URL at the same time as you're running the migration.
We get this question fairly frequently where the thinking is along the lines of "we've been planning to change the Public Hostname / URL of this system for a while, why don't we do it when we're migrating to the new system and get it all done at once?" But unfortunately, that doesn't work. The main issue is that each time you run the migration procedure, the destination system becomes a replica of the source system, including the Public Hostname. This means that even if you changed the Public Hostname on the destination system before running the migration, when you run the migration, the Public Hostname will be reverted that of the source system.
Another issue you'll run into is licensing. If you change the Public Hostname on a system with the production license installed, it will update the LiquidFiles license server with the new licensed hostname. So if you run a test migration, change the Public Hostname on the destination system, this will update the LiquidFiles license server and this will cause the current production system to become unlicensed and users won't be able to send any files.
What you'll need to do is to either complete the hostname/URL change before you attempt the migration, or complete the migration including taking the destination system into production and decommission the source system before you change the Public Hostname / URL. For more details on changing Hostname or URL, please see this Change Hostname or Domain documentation.
Conclusion
This guide has provided a high-level overview of what happens during migration. For documentation on performing the actual migration, please continue to the Migration Options documentation.